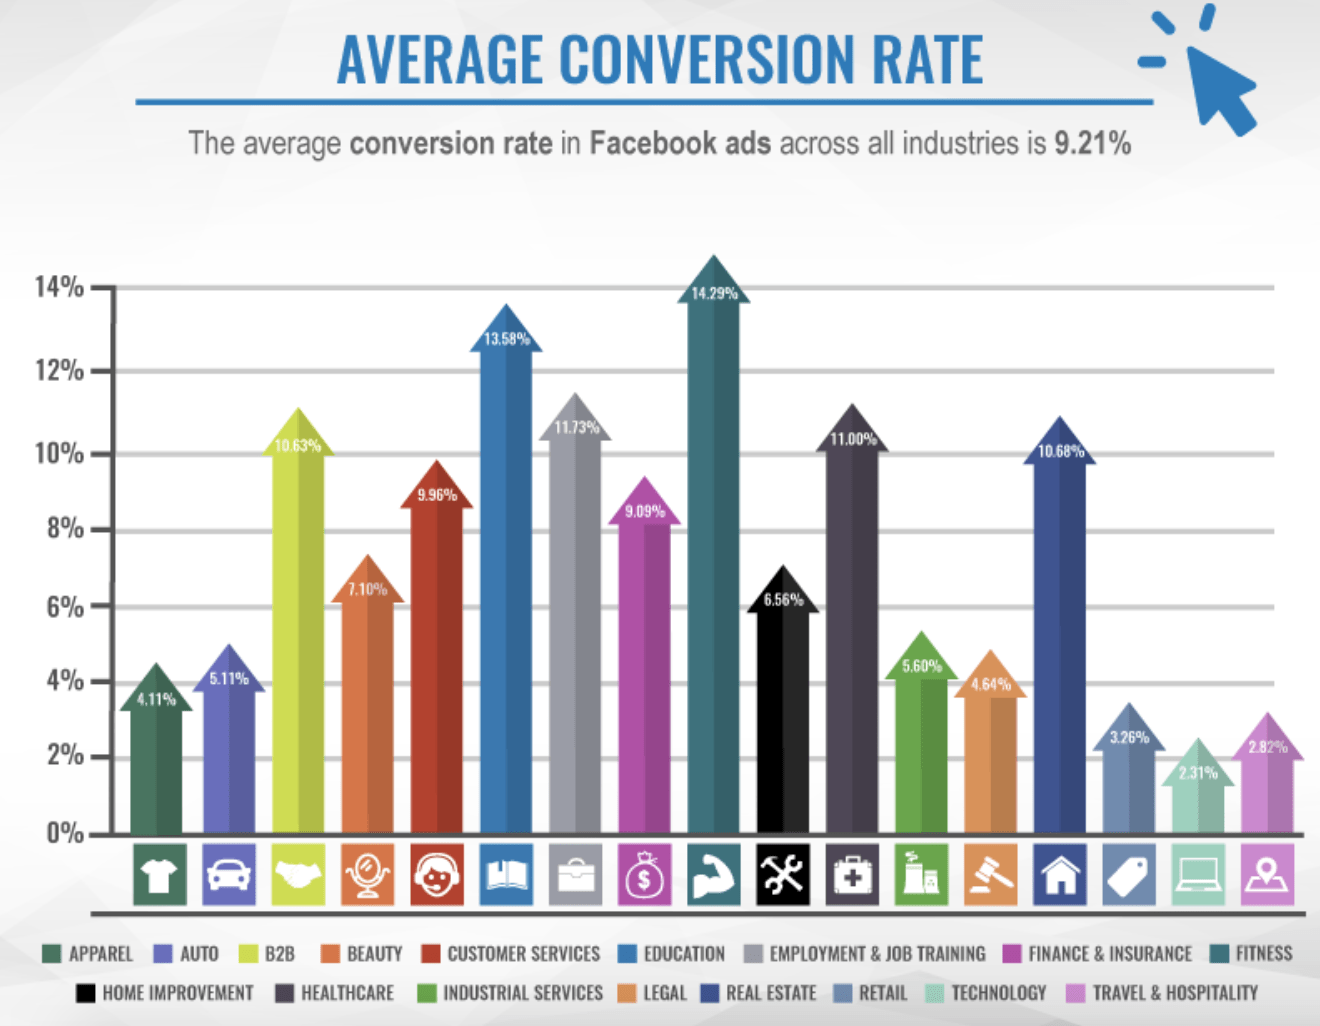
Facebook has 2.45 billion monthly active users and 94% of social media marketers use the platform. Using Facebook is a no brainer if you’re in the fitness industry – across a range of 17 industries, the fitness industry has the highest conversion rates with Facebook Ads at 14.29%.

Facebook is an essential advertising platform right now. There’s a huge opportunity to reach your audience in a very targeted and efficient way. Plus, with 69% of all adults in the United States using Facebook, there’s a high chance that your members and prospects are using the platform regularly.
If you’re already using Facebook ads, or plan to in the future, there’s one crucial tool you need to use alongside it: The Facebook Pixel.
The Facebook Pixel plays a vital role in your Facebook marketing strategy, helping you to get the most out of your social budget, drive more sales, and increase your ROI. In this article, we will discuss everything you need to know about the Facebook pixel and how your fitness business can make the most of it. Skip ahead to:
- What is the Facebook Pixel?
- How Does the Facebook Pixel Work?
- Why Should You Set Up the Facebook Pixel
- How to Create and Install Facebook Pixel
- How to Use the Facebook Pixel
What is the Facebook Pixel?
The Facebook Pixel is a piece of code that goes on your website. It’s embedded on your site and collects data from visitors. This data then helps you track the following:
- Conversion tracking from Facebook ads
- Remarket to people who have taken action on your website
- Retargeting Facebook ads
- Build custom targeted audiences for future ads
- Optimize ads
At its core, the Facebook Pixel is an analytics tool that you can use to measure how effective your Facebook advertising is.
With these insights, you’ll understand how to spend your budget on ads that deliver better results. Installing the pixel code on your website means real insight into your ads’ performance.
This video, Facebook Pixel Tutorial, from Santrel Media, explains the fundamentals of the Facebook pixel further. It helps to answer several questions about the Facebook pixel, like what is it and do you need it.
How Does the Facebook Pixel Work?
The Facebook pixel code works by triggering third-party cookies that track users as they interact with your website and Facebook ads. For example, let’s say you head over to the Nike online store and want to buy some new fitness clothing. You add some running leggings into your basket, but you leave the site without buying anything. You head over to Facebook to do some scrolling, and you see a Facebook ad from Nike showing the item you just left in your basket, as a gentle reminder to complete your purchase.
Although you may not know the parameters of the Facebook pixel or metrics, you know that it’s doing its job. The Facebook pixel is quietly sitting in the background, recording any actions taken on your website. It then syncs up with the users’ Facebook cookies and gets ready to flag the account if needed. Thanks to this data and tracking, when a potential customer hops on Facebook or Instagram, they should see particular ads.
Why You Need the Facebook Pixel
The Facebook pixel provides you with information that you can use to create better, more effective Facebook ads with precise targeting. Whether or not you’re using Facebook ads yet, you should still install the Facebook pixel onto your website so that it can start collecting data. Here are five reasons why you should set up the Facebook pixel.
Facebook Conversion Tracking
The pixel allows you to measure how people interact with your website after viewing your Facebook ad. It gives you the ability to track conversions across multiple devices as well. This is important as you can find out if someone is browsing on mobile but completes a purchase on desktop. Or maybe it’s the other way around, and they make the final purchase or sign up on mobile.
Facebook Retargeting
Ad retargeting is a type of online advertising that allows you to turn prospects into members. It’s a way of advertising to people who have already shown an interest in your brand but haven’t completed a purchase. A purchase may look like buying a class pass, signing up for a membership, or purchasing a product through your eCommerce site. The idea is that it’s easier to turn a prospect into a customer if they have already shown interest or even engaged with your brand.
Optimize Facebook Ads
With the Facebook pixel, you can optimize your Facebook ads for conversion events. Without the pixel, you can optimize your ad for link clicks but, that’s it. The pixel allows you to optimize for conversions that are much more suited to your business, like member sign-ups and purchases.
Access Facebook Ad Tools and Metrics
The Facebook pixel gives you access to more tools and metrics, giving you the ability to create better and more effective ads. If you want to build custom audiences from your site, create dynamic ads, or use web conversion campaigns, then you need to install the Facebook pixel. With the pixel, you can also track metrics like cost per conversion and cost per lead.
Drive More Sales
You can set up automatic bidding with the Facebook pixel. This means that you are more likely to reach people who will take the action you’re looking for, like signing up for a membership or making a purchase. By using a more targeted approach and making full use of all the resources and tools available, you can drive more sales and see a more significant return on your ad spend.
The Top 10 Barriers
Slowing Your Fitness
Business Growth
Discover more How to Create and Install Facebook Pixel
Before discussing how to get the most out of the Facebook pixel, we’re going to talk you through how to create and install a Facebook pixel. You can create your Facebook pixel either through your Facebook Ads Manager or through your Business Manager.
Through the Ad Manager, click the drop-down menu on the top left and click “Pixels.” You’ll then be taken to the pixel page and click “Create a Pixel” and name your new pixel. Through the Business Manager, head to the pixel section on the left-hand menu and click “+ Add” and name the pixel. With Business Manager, you can create up to 100 pixels. Assign the pixel to the right ad account or accounts so that it’s used in the correct ad campaigns.
Next, it’s time to install your new Facebook pixel. Facebook has made the process relatively simple. When it comes to installing the Facebook pixel, you have three options to choose from. Here are three ways you can install the pixel:
- Use a Facebook Website Partner – if you host your website on a platform like Wix, Shopify, WordPress, Squarespace, and a few others, you can quickly install the pixel code by following Facebook’s instructions.
- Manually Install the Code Yourself – the manual option consists of copying and pasting the code into your website’s header. You then check the status of the code by sending traffic to your website. If the status says “Active,” then the pixel has been installed correctly.
- Email Instructions to a Developer – the last option is to send instructions to a developer. If you work with a developer or have someone who can install it, you can send them the information they need. Installing a Facebook pixel should be easy for your software engineer to do.
How to Use the Facebook Pixel
Now that you’ve created your Facebook pixel and installed it on your website, it’s time to start getting the most out of it. You can use the Facebook pixel in a few different ways; here are some tips to get you started and use it to its fullest potential.
Create Custom Audiences
The pixel code is the foundation for targeting, but you still need to tell Facebook who you want to target. With the pixel, you can create custom audiences based on your website visitors. These audiences can range from pretty basic to much more complicated, depending on the metrics that you target.
For example, let’s say your fitness studio provides a range of classes, including yoga, boxercise, and spin. The Facebook pixel will track all the Facebook users who looked at your yoga classes, and when. So, you could create a custom audience to push yoga classes. Therefore, you would target Facebook users who visited the yoga class page of your website in the last 30 days.
Collect Data on Standard or Custom Events
The Facebook pixel can collect data on both standard and custom events. An event is an action that a user has taken on your website. For example, they might make a purchase or sign up for a newsletter. To track this event code, you have to add individual code to specific pages. The pixel will then tell Facebook when an action on your website has triggered an event. There are 17 standard events where you can copy and paste the standard event Facebook code. Here are some of the standard events you can use:
- Purchase
- Add to Cart
- Add to Wishlist
- Subscribe
- Start Trial
- Find Location
- Donate
- Search
You can also use the pixel to collect data on custom events. This means you can measure more specific customer actions than you could with standard events. Facebook provides further instructions on how to set up and capture data from both standard and custom events.
Track the Right Events
When it comes to events, you have a fair amount of options. Make sure to track the events that matter most to your business and goals. Measure events and conversions throughout the customer journey that will lead to more effective ad management.
If you sell protein powders and branded merchandise on your website, it would be useful to track events like “Add to Cart,” “Purchase,” and “Add to Wishlist.” These options all show a different part of the customer buying journey. Someone who has added an item to their wishlist is at a different stage to one who has made a purchase. The ads need to be optimized accordingly for the specific target audience.
Add a Pixel Notice to Your Website
You need to make sure your website visitors are aware you’re collecting their data. To comply with Facebook’s laws, you need to add a clear notice to your site that lets users know that you’re using the Facebook pixel. You also need to let users know that they can opt-out of this data collection. Make sure you have your bases covered, and you’re following the rules when it comes to collecting data and tracking cookies.
Insert Pixel Code on Every Web Page
Remember to put your whole pixel code on every page on your website. To get the most out of your pixel, you want to track conversions on every page. This way, you won’t miss anything out, and you’ll always see the full picture. Don’t forget about your mobile website as well. If you have a separate mobile website, you need to copy the pixel code onto every page. The pixel can track data across multiple devices, so make sure you have every page covered.
Make Sure Your Pixel is Working
Finally, it seems like an obvious one but, double-check that your pixel is working. You should find out early on if there’s a problem. That way, you can fix the issue and continue tracking valuable data.
During installation, you already would have performed a quick test to see if it’s working. But, before you start relying solely on the pixel, you need to confirm that it’s tracking correctly. Install the Facebook Pixel Helper. It’s a Google Chrome browser extension. If you’re not using Chrome, then you won’t be able to use the extension.
To use the extension, you need to visit the web page where the pixel is installed. If the extension finds the pixel, there will be a blue icon and an indication of how many pixels are on the page and if it’s working correctly. If it’s not working, it will provide you with information so that you can correct the problem.
In Summary
The Facebook pixel is an essential analytics tool that gives you the power to take your Facebook and Instagram ads to the next level. With the right insight and metrics, you can optimize ads, create custom audiences, and drive more sales. This allows you to nurture and turn potential customers into paying members who love your brand.


